|
|
|
Practice projects.
|
|
|
For your first image composite, lets do the same image shown above.
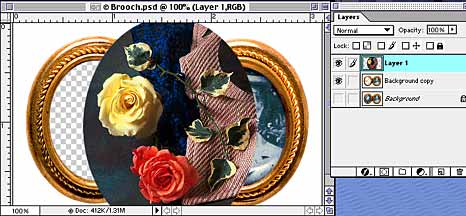
Start by finding the image titled “Broach” in the image bank. What we will do with this is select one of the inner images and delete them creating a hole in which we can paste another image into.
|
|
Show your layers palette. (Remember? WINDOWS/SHOW LAYERS.) Duplicate that layer. Turn off the background layer.
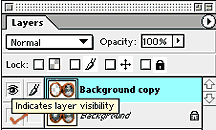
This isn’t just an “insurance” measure now. The bottom most layer that Photoshop usually opens an image in is called the “background” layer. It is in italics. This layer is somewhat strange in that it won’t let you do much to it. When we go to punch a hole into this layer, instead of a hole it will simply fill with white, the background color. It has other limitations too. Duplicating the layer creates a more editable layer. Even if it’s called “background copy” it is NOT in italics and IS editable. Turn the background layer off. (Click the eyeball in front of the layer.)
| 
|
|
Next, get your oval marquee tool. See if you can select the inside of one of the pictures. Leave the frame. Remember if you need to move the selection around, use the spacebar.
Don’t let go of the mouse until your selection is where you want it. If you miss, go to SELECT/DESELECT or command D (on a mac) and try again.
Not so easy at first is it? If your having problems with this keep reading.
| 
|
|
OK, lets try this from the center out. Put your curser right in the center of one of the frames. Hold down your OPTION key. Now drag straight down until you have a skinny oval that just about touches the top and bottom of your image.
Hold your space bar down if you need to position that up or down. Don’t worry about the sides just yet. Get the top and bottom of your oval to meet the top and bottom of your frame. Let go of the space bar. DONT let go of the mouse.
Once it touches the top and bottom, drag out to the side until the sides of your selection line meets the sides of the frame.
Again, if you miss the mark,
hold down the space bar and move the entire selection over. Let go of the space bar to continue changing the shape of the selection line.
ONLY when you have it right where you want it, let go of the mouse! THEN the keys.
With your selection in place, hit your DELETE key on your keyboard. (Some keyboards may have that labeled the backspace key. It’s the same key.)
You now have a “hole” in your image. If you don’t see one, check that you do in fact have your background layer turned off. If not, you will have the hole but your looking at an exact copy of the original image underneath.
| 

|
|
Next, go open another image. I used one called "fruit" and my colorized Flower Girl image but you can use anything.
Select some portion of the image you just opened and go to EDIT/COPY. Turn that image off, you won’t need it anymore.
| 
|
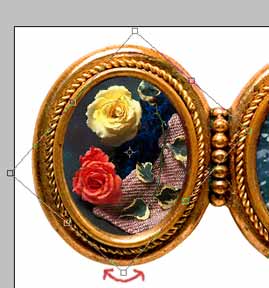
Back to your broach, go to EDIT/PASTE. Note that any time you paste, Photoshop will automatically past into a new layer directly above the layer you have active. For this image you need to move the layer you just pasted so it is under the frame layer. Don’t worry if your pasted image is too large or too small. We’ll fix that next.
|
If you got lucky and copied a piece just the right size great! Lets assume you didn’t. For my practice image I took some flowers off an image titled “Fruit.” The pasted bit is much larger than my hole. It needs to be scaled down and I even rotated it a little.
Go to EDIT/TRANSFORM and keep holding down your mouse. Transform has several sub commands. Scroll down to SCALE and let go.
| 
|
|
Note the box that appears around the item you want to scale. There are small boxes on the corners and sides. Those are called “handles.” To scale an image, hold down a corner handle and ALWAYS hold down your shift key. Drag in or out and to resize your image.
You MUST hold the shift key to keep your image from becoming distorted. Remember that is called “constraining.” You MUST hold a corner handle and not one of the side ones. If you grab a side handle it will over ride the shift and you will squash your image.
Further, you can move your image around. With your MOVE tool selected, just grab any place within the box and drag your image. NOTE there is a small cross hair type thing right in the center. Don’t grab that. It will not move your image. It simply moves what your computer will consider the center of your image.
|
|
If you want to rotate too, go back to EDIT/TRANSFORM and scroll down to ROTATE. The same box is still on your screen but now when you grab a corner handle, a small curved double arrow appears where your curser is and when you grab a corner and move it, the image rotates.
NOTE; it rotates around that center cross hair. If you move that to say, the upper left area of your box, the image rotates around it.
| 
|
|
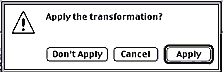
Once you are done scaling, rotating or doing anything in the transform menu, it need to be “applied.” This is a really memory intensive function. You might notice that when you scaled your image it looks rather grainy. Photoshop is only giving you a preview of what your image will look like. To get this to apply now, what I do is just grab a tool. Any tool. A menu will pop up and ask you to “apply, cancel, or don’t apply.” Click on apply and the graininess of your image clears up.
| 
|
For practice, try all this again on the other side. This time, see if you can select using the lasso tool.
|
|
The Vignette. and menu commands.
|
|
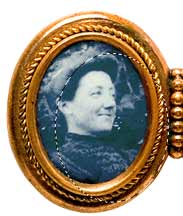
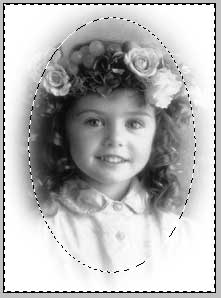
Here is another practice image. This one is really easy to do.
Open an image. Portraits work really well for this one. Again, duplicate the layer and turn off the background layer.
Select an area with your oval marquee tool.
Until now, any time you cut out or copied a selection the edge of the image is rather sharp. It has sort of a cut out of cardboard look. For a vignette we don’t want that at all.
With your selection active, (your dancing dotted lines are marching along,) go to SELECT/FEATHER. A window pops up where you can type in a number. It means the number of pixels you want to fuzz. For this image I typed in 12. Click OK. You won’t see anything happen but it has.
All of your selection tools select a closed shape and all of them select the inside of that shape. This time we want to delete everything outside our selection line. To do this, go back to the menu bar and SELECT/INVERSE. Now look at your image. Your oval dancing line is still there but now there is another one around the outer edge of the image. That tells you everything in between the two lines is selected.
Hit the delete key.
| 
|
|
You can at this point create a new layer and drag that under your vinette image. Fill that with a color, or texture or whatever.
Your done. That’s it! Easy so far?
There is still more to learn about selecting but that's the next lesson.
|
|
| Finally, here is an image I put together for my Father in law. This is here just to give you ideas as to what you can do with some simple copy and paste.
My Father in law loves old trains. Especially the old electric inter urbans.
I found this picture on the internet. (Photographers credit is included.) This particular train stopped running back in the 1940s. Long before his son was
even born.
Then I found a vacation shot of his son and grand son. We all have those "we were here" type shots. This one was taken at some scenic view somewhere.
I selected and cut out the figures. Pasted them in their own layer and turned off all other layers. Then had to adjust a few things.
In this vacation shot my husband was leaning against a fence with his hand out on the rail. Once the background and thus the fence were cut out, this arm
sticking out had to be changed. I selected his arm at about the elbow with the lasso tool. Cut it and pasted it into a new layer. Used TRANSFORM to
rotate it then erased his fingers to make it look like his hand was in his pocket. The correction didn't have to be exact because I knew I would be scaling
them down from a 5" image to something the size of my finger nail. Mistakes vanish when you do that.
I also had to use TRANSFORM/FLIP to turn them around. They were facing the wrong direction.
Once pasted into the train picture, and scaled down to size the last step was to create a new layer between the figures and train shot. Using the eye dropper
tool I selected a medium shade of gray from one of the shadows in the image and with the airbrush dusted in a "shadow" behind the figures.
That's it! An image that would be totally impossible to get any other way.
|

|
|
|---|