
|
|---|
|
|
|---|
|
|---|
| ⦁ Introduction |
| Colorizing a black and white photo. | 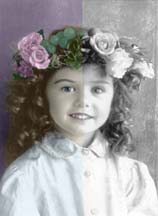 | |
|
Before the advent of color photography the only way to have a color photograph was to literally apply color to the black and white image. There were a
variety of ways to go about this. No matter what the method, color must be transparent so the detail of the image can show through. The end result is a
very soft, very unique effect.
For our first lesson we will reproduce the same effect by airbrushing color to a black and white image.
In this lesson you will be introduced to the following.
Tools,
| ||
|
Before we can start having fun colorizing, it's necessary to become familiar with the layers pallet and with tool settings. Layers Launch Photoshop and go to FILE/NEW. A pop up window will appear. Set your background to white, DPI to 72 and size doesn't' really matter. 4" x 4" would be fine. Click OK. This will give you a blank space to practice on. Next, in your menu bar go to WINDOWS/SHOW LAYERS to bring out your layers palette. Now lets take a look at that palette.
At the upper right of the layers palette is a little black arrow. Hold that down and a pull down menu appears. These same functions can also be found under LAYERS in your menu bar. Personally, I find the arrow ON the layers palette easier to use but either way will work. | ||
 | ||
 | ||
| Look at the bottom of the layers palette. There are several small icons. To quickly see what each one does, just hold your cursor over one for a few seconds. A dialog box will appear which tells you what that icon does. NOTE; one of those icons, a double box, is a handy way to create new layers. Using the arrow on top for the pull down menu to create a layer allows you to give the layer a name right away. The icon just creates a layer instantly and names it layer 1 or layer 2 and so on. (You can still title a layer later by going to LAYERS/LAYER PROPERTIES and titling it then.) | ||
|
Paint tools You'll need to be able to select colors easily. In your menu bar, go to WINDOWS/SHOW SWATCHES. Now locate your airbrush tool and click on it to activate that tool. (If the box the tool is in is gray, it is selected.) With your airbrush selected, when you pass your cursor over the swatches notice the tool changes to a small eyedropper. Just click on a color and it is selected. Go ahead and practice spraying some paint on your blank document. | ||
|
Take a look just under your menu bar now to the airbrush settings. (If you have a version older than 6, double click your tool to bring out a settings palette.) By "brush" click the arrow. That brings up the brush sizes. Note that some have a fuzzy edge and some are sharp. Try a few and see how they work. Now take a look off the the right there is an opacity setting. The lower the number, the more transparent your paint. Try a few differant settings and see how it paints. | ||
 | ||
| Back to "brushes." if you click to the left of that little arrow, right on the brush number, you can customize your brush to whatever size or degree of sharpness you like. You probably won't need to mess with that for this lesson as there are plenty of preset brushes to choose from. |  |
|
|---|---|---|
| Notice as you "paint" your airbrush will behave just like a spray can of paint. Go over the same space twice and the coverage becomes more opaque. Hold over the same space while you spray and again, the area becomes more opaque. |  |
|
|
The eraser. Now locate and select your eraser tool. Note that is has the same type of settings as your airbrush. There is also a bar in the tool settings window that allows you to set your eraser to behave as any paint tool. Pencil, paint brush, block or "airbrush." Set your eraser to airbrush and set opacity to something low, say 20% and see how it behaves on your practice paint. |  |
|
Lets look at the layers palette again. In the next example, I clicked the icon at the bottom of the layers palette to create a new layer. Layer 1. With my airbrush selected, I picked a shade of green out of swatches and painted a green ball. Next I created another layer. Layer 2. Selected another color and painted a red triangle. Think of layers as a sheets of glass all stacked up on one another. If I were to paint those two shapes on one layer, that's it! They are just painted on one sheet of glass. By putting each shape on it's own layer, I can move them independently of each other. This is the ONLY way to keep "objects" on your image separate. It not only allows you to move one object independent of the others on an image, it's also a safeguard against erasing or painting on an area you don't want to alter. Only the active layer can be effected. | ||
 |
||
You can rearrange the order your layers are stacked in by moving your cursor over a layers name. Click and drag that layer to whatever position in the stack of layers you want. Look at the same two shapes below. The bottom one is now on top. | ||
 |
||
Finally, notice the little "eyeball" icon to the left of every layer. By clicking that you can turn a layer off or on again. You don't lose the information contained in that layer, it just hides it. | ||
 | ||
NOTE: Don't click on the box between the eyeball and layer thumbnail. It links layers together and we won't need to do that just yet. | ||
So... are we ready to start having some fun??? Lets go to the Next Page |
||