
|
|---|
|
|
|---|
|
|---|
| ⦁ Introduction |
| Introduction to Masking. | |
Many of the neat things you can do with Photoshop require you to first isolate some element or elements from an image. Either to remove, or transform, or place on a different layer to add effects without effecting other parts of the image. We covered all the various selection tools already and by now you must realize they all have certain limitations. For example, if you were trying to select a very complicated shape with the lasso, the task could easily become a full time career. One mistake, one sneeze and you have to start over. The wand can be helpful when it comes to selecting complex areas but doesnĺt always manage to select just what you want it to. Enter the quick mask. Here is a brief description of what we are about to do. The mask is just another means of making a selection. Start out by making a selection on your image with any of your selection tools. When you turn on the quick mask, a semi transparent red film appears over all the areas not within the selection. Using any paint tool, paintbrush, pencil etc, paint in mask over areas you do not want selected, and use your eraser to erase mask over areas you do want selected. All you are doing is moving that selection line. Thatĺs all. This does not erase or paint anything over your image. For some reason, Iĺve found that the concept of using the quick mask is difficult for beginners to grasp. This is really not a difficult thing to master once you get the hang of it. Once you understand how it works, you will find this is a very convenient way of making accurate selections. |
| Go ahead and open an image just to see what Iĺm talking about. I used ôFruitö here. Make a selection. | 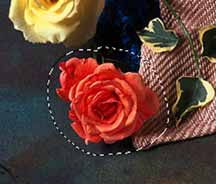
|
| Turn on your mask. The mask is located in your tool bar just under the foreground/background color boxes. There are two icons side by side. This is your quick mask. Click on the right side to turn it on. The left side turns it off. NOTE; Beginners do this all the time. You must make a selection with any of the selection tools we already covered first. THEN turn on your mask. Iĺve seen students try and work with that mask on not realizing it is on and things just donĺt do what they are supposed to. Make your selection first. THEN the quick mask. | 
|
| Select a painting tool. I find the paint brush works best most of the time. Be sure it is set to 100% pressure and always grab a hard edged brush for masking. The fuzzy edge ones will leave dust size holes in your mask. Weĺll discuss when to use fuzzy brushes later on. For now, hard edge is the rule for masking work.
Check your forground/background colors
| 
|
| So again. Be sure your colors are B&W, make a selection, turn on the mask, get the paintbrush and be sure itĺs set to 100%. Get a hard edged brush. Now paint in mask over areas you will not want in your selection. Use your eraser to remove mask covering areas you want inside your selection. The eraser also needs to be set to paintbrush, 100% and hard edge. | 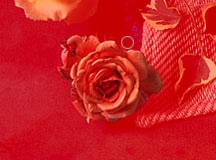
|
| Turn the mask off. (Left side icon) and see? Your selection line has moved. Consider the mask a ôselection line editing tool.ö Thatĺs all it is supposed to be. This isnĺt hard now is it? | 
|
| I have a few practice assignments which should get you accustomed to using the mask. Lets get started with the first one. Open the image called Watches. Remember our broach image? The one where you had to select the image inside the oval frame and delete it then place another image in the hole? Well weĺre going to do about the same thing here with one of the watches only this time, we need to leave the hands and numbers in place and not delete them. | |
| Duplicate the layer. Remember background layers will not let you punch a hole in them. We need an editable layer. Turn off the background layer. (Click the eyeball in the layers palette.) Use your oval marquee selection tool and select one of the watch faces. Remember our earlier lesson? Hold down your option (alt) key to draw from the center out, hold down the shift key to draw a perfect circle, and hold down the space bar to move your selection around. Let go OF THE MOUSE FIRST! THEN your keys. | 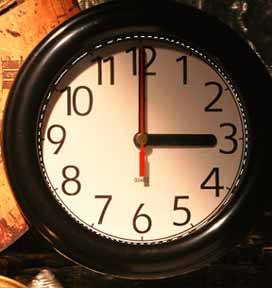
|
| Turn on the mask. Be sure your foreground/background colors are B & W. (Hit ôDö on your keyboard.) | 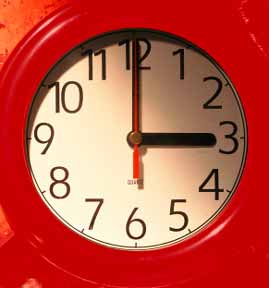
|
| Get your paint brush and it helps here to select a brush size to fit the area your painting. If none of your preset brushes quite fits you can create one that is right. The left side icon of your brush sizes is the brush editor. There you can set the diameter to any size you need. Be sure your brush is set to 100% pressure. | 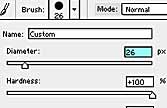
|
| Paint in the watch hands and numbers. | 
|
| Zoom in close for details when needed. | 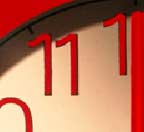
|
| If you need to remove mask you can get your eraser but hereĺs a trick to make life simple. When masking, you can switch your foreground and background colors around. Note the little curved arrow by your foreground background colors in the tool bar? Click that and they switch places. Now your paintbrush will act as an eraser. This is sometimes easier than switching tools back and forth. Especially since both tools will remember what brush size it was set to last. By flipping the foreground/background colors your paintbrush acts like an eraser but is still at the same brush size. This little trick only works with masking though. If you were actually painting and tried this, instead of erasing, youĺd be painting with the background color. | 
|
| When you get your hands and numbers masked, turn the mask off. (The left mask icon.) Now you can see that you have the watch face selected and when you hit the delete key, the hands and numbers donĺt get deleted. | 
|
| Hit delete. | 
|
| Go open some other image. Whatever you like. Copy it, go back to the watches and paste. Move your pasted image layer under the watches layer and use your EDIT/TRANSFORM to change the image size if needed. | 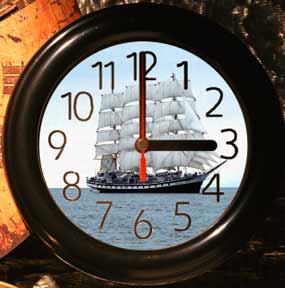
|
| Finally, if you do need to do a little touch up, it might not be necessary to use the mask again. For my sample, some of the numbers had a little of the tan background color around the edges. A little touch up with the eraser takes care of that. | 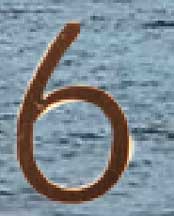
|
| Thatĺs it. Your done. Our next lesson will also involve masking but with a little Photoshop filter magic at the end. I've got to give you all something to look forward to. | 
|
| Just a few more notes and tips here. In many ways Photoshop tools are similar to the tools real photography uses. In photography, especially for newspapers, magazines and other print material they often times have to repair imperfections in a negative before a print is made. Scratches, or white lines caused from photographing a full page made up of bits of articles or images pasted together must be blocked out. Red tape, or red paint called rubylith is applied to the negative and effectively blocks light from passing through any scratches or imperfections before it goes to print. Well in Photoshop the mask (sometimes called the ôruby maskö) doesnĺt have to be red to work. The mask by default will show up set to 50% opacity and will be red. If your image has a lot of red in it, masking with a transparent red mask might make you go blind! To change the color of your mask, or even itĺs opacity, simply double click on the mask icon. A menu comes up with a color box, click on that and pick a different color. The pressure setting does NOT effect how the mask works. It is only transparent so you can see what your masking. 50% is usually good enough but if you need to change that, this is the place. The mask itself will function at 100% no matter what itĺs opacity setting as long as your painting and erasing tools are set to 100% pressure settings, and your foreground background colors are black and white. | 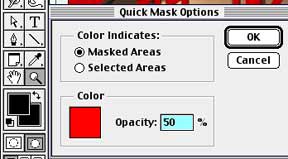
|